Getting started
This book contains guides, helping to get started with the Rust Trust Spanning Protocol (TSP) implementation.
See https://trustoverip.github.io/tswg-tsp-specification/ for the TSP Specification.
Quick start
See the web interface to get started with TSP without installing any software. The web interface is intended to showcase the direct communication mode of TSP, the Composable Event Streaming Representation (CESR) encoding of messages and for testing purposes.
CLI
See the command line interface guide to get started with the test CLI for TSP. The TSP CLI is an example application of Rust TSP that helps to test the direct, nested, and routed mode of TSP. There is some support infrastructure deployed on https://did.teaspoon.world/, https://p.teaspoon.world/ and https://q.teaspoon.world/ to get started quickly.
Web interface
A short demo of the web interface:
Overview
Go to https://demo.teaspoon.world/
This interface allows us to create VIDs and send and receive messages.
The VID type used for this demo is did:web. When a new identity
is created, the corresponding did.json document is published on the DID support server (https://did.teaspoon.world/endpoint/{username}/did.json).
The transport used for this demo is HTTPS and web sockets (WSS). The server also acts as a transport backbone.
Getting started
Create an identity
To get started, create an identity:
- In the top left corner enter a username, e.g.
alice - Press "Create test VID"
In the list of identities on the left, your VID with the corresponding key material will be shown. This identity will also be stored in the local storage of your browser. The next time you visit this page, it will be loaded automatically.
Resolve and verify a VID
To resolve a VID, follow the instructions below.
Note that VIDs of the type did:webvh, did:web and did:peer are supported.
In order to be able to resolve a VID you could open the web interface in an "Incognito" browser window and create a new VID. You should use "Incognito" to prevent the identities in your local storage from being overwritten. This way you can have a window for a sender and a window for a receiver identity and test sending messages from one to the other.
Note that this will also work over the internet, sending messages from one device to the other.
Enter a full VID in the field "Resolve and verify VID" and push the button.
For example, endpoint bob might have identifier did:web:did.teaspoon.world:endpoint:bob.
You can also verify identifiers from other external DID Web servers. For example, the identifier did:web:raw.githubusercontent.com:openwallet-foundation-labs:tsp:main:examples:test:a points to this did.json in the TSP GitHub repository and can also be verified by the demo server.
The resolved and verified VID will be displayed in the "Identities" column.
Sending / receiving messages
Use the "Send message" for to send messages. The "Sender" and "Receiver" fields must be filled in with fully qualified VIDs, that exist in the "Identities" column.
For example, we could fill in did:web:did.teaspoon.world:endpoint:alice as sender and
did:web:did.teaspoon.world:endpoint:bob as receiver if we have the private VID for
did:web:did.teaspoon.world:endpoint:alice and the Public VID for did:web:did.teaspoon.world:endpoint:bob.
The contents in the "Non-confidential data" will be added to the TSP unencrypted. The contents of the field "Message" will always be encrypted.
A browser window with the private VID of the receiver will show all messages addressed to this VID in the "Received" column.
Select sender / receiver
Instead of entering the full VID in the "Sender" / "Receiver" fields, you can also use the "Select sender" and "Select receiver" buttons in the "Identities" column.
Ad-hoc verification
If a message is received from an unknown sender the button "Verify" can be pressed to resolve and verify the sender VID and decrypt / verify the message contents.
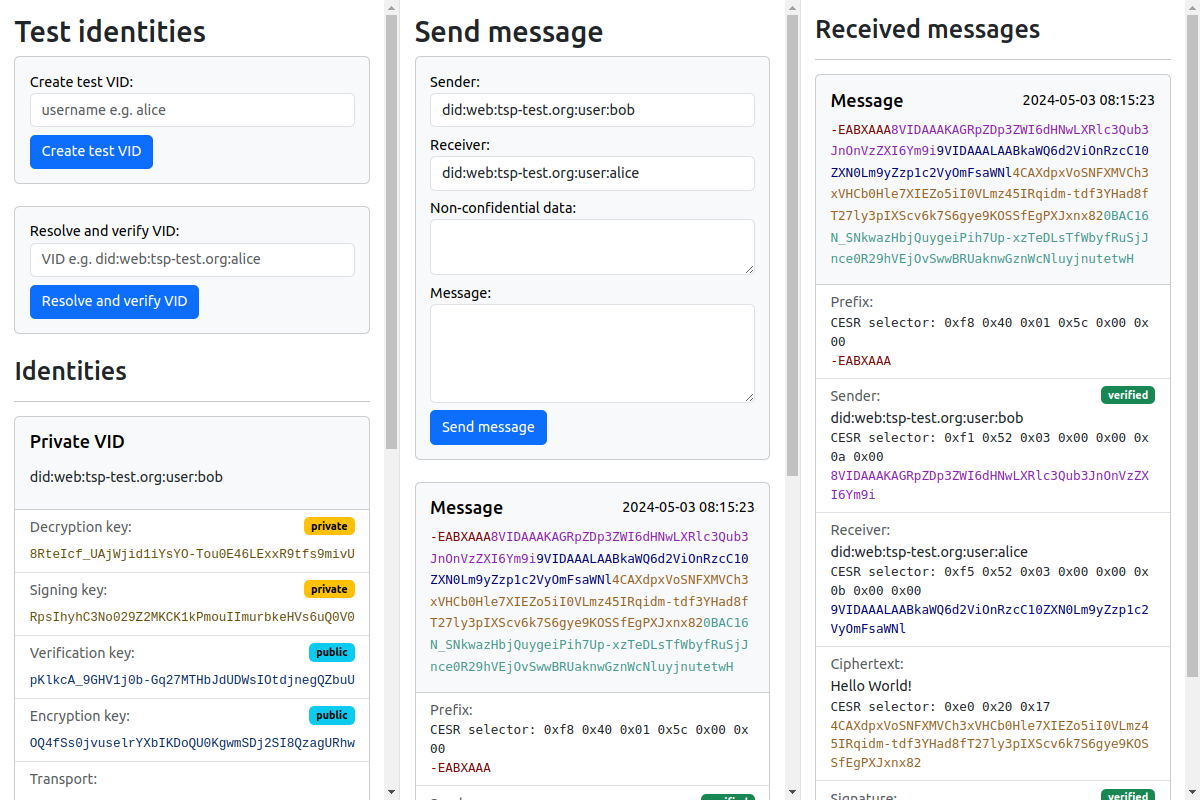
Message debug print
Each message is shown in the CESR text domain. The individual parts, the selectors and possibly the plaintext variants of these parts are shown below.
TSP Command Line Interface
The command line interface is an example application of the Rust TSP implementation. It helps testing and exploring TSP, the cryptography, transports, modes and message encoding.
Read the next sections on how to get started.
A short demo of the CLI (made using the TSP SDK development version of May 2024):
Installation
To get started with the CLI, first install Rust. See https://www.rust-lang.org/tools/install. The fastest way is running the following command in your terminal:
curl --proto '=https' --tlsv1.2 -sSf https://sh.rustup.rs | sh
After Rust is installed, you should be able to run cargo:
cargo version
Output:
cargo 1.86.0 (adf9b6ad1 2025-02-28) # for example
Installing the TSP CLI program:
cargo install --git https://github.com/openwallet-foundation-labs/tsp.git examples --bin tsp
If you want to manage DIDs of type WebVH, you have to compile the CLI with the feature flag create-webvh.
Simply add --features create-webvh to the above command.
You can always verify WebVH, even without enabling the feature flag.
You should be able to run tsp:
tsp
Output:
Send and receive TSP messages

Usage: tsp [OPTIONS] <COMMAND>

Commands:
  show        Show information stored in the wallet
  verify      verify and add a identifier to the wallet
  print
  create      create and register a did:web identifier
  update      Update the DID:WEBVH. Currently, only a rotation of TSP keys is supported
  import-piv  import an identity from a file (for demo purposes only)
  discover    Discover DIDs from the DID support server
  set-alias
  set-route
  set-parent
  send        send a message
  receive     listen for messages
  request     propose a relationship
  accept      accept a relationship
  cancel      break up a relationship
  refer       send an identity referral
  publish     publish a new own identity
  help        Print this message or the help of the given subcommand(s)

Options:
  -w, --wallet <WALLET>          Wallet name to use [default: wallet]
      --password <PASSWORD>      Password used to encrypt the wallet [default: unsecure]
  -s, --server <SERVER>          Test server domain [default: demo.teaspoon.world]
      --did-server <DID_SERVER>  DID server domain [default: did.teaspoon.world]
      --verbose
  -y, --yes                      Always answer yes to any prompts
  -h, --help                     Print help
  -V, --version                  Print version
Usage
Create a first identity
The tsp command line tool will store its wallet encrypted using Askar in the current directory. See the custom secure storage page for documentation about how to implement custom secure storage solutions.
To create a test did:web identity with the username example run the following command:
tsp create --type web example
Output:
INFO tsp: created new wallet
INFO tsp: created identity did:web:did.teaspoon.world:endpoint:example
Note: the DIDs need to be unique. You may need to use a different username if example already exist on the DID server.
We can add an alias to a VID using the --alias argument:
tsp create --type web example --alias example
In subsequent commands we can type example instead of did:web:did.teaspoon.world:endpoint:example.
Every tsp subcommand also supports the --verbose flag for a more verbose output:
tsp --verbose create --type web example --alias example
Output:
TRACE tsp: opened wallet wallet
 INFO tsp: added alias example -> did:web:did.teaspoon.world:endpoint:example
 INFO tsp: created identity did:web:did.teaspoon.world:endpoint:example
DEBUG tsp: DID server responded with status code 200 OK
TRACE tsp: published DID document for did:web:did.teaspoon.world:endpoint:example
TRACE tsp: persisted wallet
Show wallet content
In some cases, it might be helpful to check what the wallet contains to understand the behavior of TSP.
Therefore, the CLI provides a show command.
The tsp show local command will print all the local VIDs stored in the wallet,
including their alias, transport, and parent.
did:peer:2.Vz6MurhTjqX5uhQ5bJbAaoEwSDFcKDwVJTvoii51JBtSPpKzX.Ez6LbvBvy92yWENk8xKYmaX9X9nzMtQCQ2EqgdLKv2YkcpHo7.SeyJzIjp7InVyaSI6InRzcDovLyJ9LCJ0IjoidHNwIn0
	 Alias: None
	 Transport: did:web:raw.githubusercontent.com:openwallet-foundation-labs:tsp:main:examples:test:b
	 DID doc: None
	 public enc key: XwZQDosAabkk61UmCcLaQKrvlgM6RLX+9bsVe2TCplo=
	 public sign key: AeQsHfFqfWT/tuImrIoanqkui0rvVezHP4gBfCA2g6g=

did:web:raw.githubusercontent.com:openwallet-foundation-labs:tsp:main:examples:test:b
	 Alias: b
	 Transport: https://q.teaspoon.world/transport/did:web:raw.githubusercontent.com:openwallet-foundation-labs:tsp:main:examples:test:b
	 DID doc: https://raw.githubusercontent.com/openwallet-foundation-labs/tsp/main/examples/test/b/did.json
	 public enc key: JY/sQu1c8LJq6aTR9TlUMdNDf6xEzqkZeuJH6berxFk=
	 public sign key: EAA90CN5qEnTUXyNpPRmVsME2Qyxjj/KlRbP2DcXrF4=
Additionally, tsp show relations <local VID or alias>
will provide all resolved VIDs that the local VID has a relation with,
including the alias, relation status, and transport.
did:web:q.teaspoon.world
	 Relation Status: Bidirectional
	 Alias: q
	 Transport: https://q.teaspoon.world/transport/did:web:q.teaspoon.world
	 DID doc: https://q.teaspoon.world/.well-known/did.json
	 public enc key: slqqOWKP1WhCN+X/tuGgoUkrryA6F//f5rV6cqXsL3Q=
	 public sign key: djnK+ljzZsA2gX/X/IUy1Y06+j5Souo1bzTDZ9RoJxc=
Resolve a VID
VIDs created with the tsp tool are published on did.teaspoon.world (unless you specify a different DID support server using the --did-server option).
Currently, Rust TSP is able to verify did:webvh, did:web and did:peer VIDs.
You can use the tsp discover command to discover DIDs that are hosted the DID server:
tsp discover
To resolve and verify a VID, run the following:
tsp verify did:web:did.teaspoon.world:endpoint:example
Output:
INFO tsp: did:web:did.teaspoon.world:endpoint:example is verified and added to the wallet
The verify command also supports the alias argument:
tsp verify did:web:did.teaspoon.world:endpoint:example --alias example
Send a message
For this example, we will create two identities with separate wallets - alice and bob.
You could perform the operations for alice and bob on different computers, for this example we will separate them by using distinct wallets.
Use the --wallet flag to specify the file name of the wallet.
First create the identity for alice:
tsp --wallet alice create --type web alice --alias alice
Then create the identity for bob:
tsp --wallet bob create --type web bob --alias bob
Let alice verify bob's VID and add it to the wallet alice:
tsp --wallet alice verify did:web:did.teaspoon.world:endpoint:bob --alias bob
Let bob verify alice's VID and add it to the wallet bob:
tsp --wallet bob verify did:web:did.teaspoon.world:endpoint:alice --alias alice
Let bob start listening for a message:
tsp --wallet bob receive bob
Since the above command will block / wait for messages we should use a new / different terminal to send the message from alice.
To send a message run the following:
echo "Hello Bob!" | tsp --wallet alice send --sender-vid alice --receiver-vid bob
Note that alice and bob are aliases of did:web:did.teaspoon.world:endpoint:alice
and did:web:did.teaspoon.world:endpoint:bob.
On the receiving side you should see:
 INFO tsp: received relationship request from did:web:did.teaspoon.world:endpoint:alice3, thread-id 'lrQoJ1qYIK6HEHZKvpq3p+it6djYE2YIe++5mqhASnE'
did:web:did.teaspoon.world:endpoint:alice3      lrQoJ1qYIK6HEHZKvpq3p+it6djYE2YIe++5mqhASnE
 INFO tsp: received confidential message (11 bytes) from did:web:did.teaspoon.world:endpoint:alice3 (HPKE Auth, Ed25519 signature)
Hello Bob!
Supported DID types
The TSP CLI example application supports two types of decentralized identifiers:
did:web, created usingtsp create --type web. These are resolved by finding a.jsonfile on a server and checking its contents.did:webvh, created usingtsp create --type webvh. These are resolved by finding a.jsonfile on a server and checking its contents.did:peer, created usingtsp create --type peer. These are essentially self-signed identifiers.
The TSP CLI can use two types of transport:
-
https, which forces the use of a broadcast server application (seeserver.rs), but will work well across firewalls. -
tcp, which requires a direct network connection between two instances of the TSP CLI. In practice, you can use this only on a local network (or the same machine, if you use different ports), but this functionality is added to demonstrate the flexibility of having multiple transports. To use TCP transport, use the--tcp address:portflag totcp create.
The TSP SDK also provides a couple more transport types and provides methods to use custom transport solutions (see transport layers), although these are not available through the CLI.
Pretty print messages
The CLI has a --verbose flag.
For the send command, this will output the CESR-encoded TSP message that is sent.
Continuing with the alice and bob example:
echo "Hello Bob!" | tsp --verbose -w alice send -s alice -r bob
Output:
 INFO tsp::async_store: sending message to https://demo.teaspoon.world/endpoint/did:web:did.teaspoon.world:endpoint:bob
CESR-encoded message:
-EABXAAA9VIDAAALAAAZGlkOndlYjp0c3AtdGVzdC5vcmc6dXNlcjphbGljZQ8VIDAAAKAAZGlkOndlYjp0c3AtdGVzdC5vcmc6dXNlcjpib2I4CAX7ngr3YHl2z91L-anFBYxbQhM48CT_wqrCCRNdsN5fm-oshqvwqnKDK5rLkn_kvVI8aWZ7SEhiaiB8N6e-bjInrBbhNII0BAceo-mZoSvG3MY_UEqrgzP4kpeLJJK9MdQx53c4nxKh6_jvB2DuXJ6TBNjj-lXszyTH8yDAMSioDRluucSBpPAg
 INFO tsp: sent message (11 bytes) from did:web:did.teaspoon.world:endpoint:alice to did:web:did.teaspoon.world:endpoint:bob
In a terminal window supporting colors, this will look like the following:
-EABXAAA9VIDAAALAAAZGlkOndlYjp0c3AtdGVzdC5vcmc6dXNlcjphbGljZQ8VIDAAAKAAZGlkOndlYjp0c3AtdGVzdC5vcmc6dXNlcjpib2I4CAX5I7ozAGaFVqTxz8PJve0Tscor80fvds6hCf3yDUtOnHpXZ84uXFGXM-PcfLDWsRWvH7SoOG4UwQU8H-zEfBFs0skhjtk0BAtrMgdWXM9Mfdgiq2awx6VAWCUUYCfjv1tdQqnjNc4eB-IOdBVA459uAFX2EGfdWWGp2OxxwbAutneudE9zYUBg
The first red part is the TSP prefix. The purple part is the sender VID, the blue part the receiver VID, the yellow is the ciphertext, and the cyan part is the signature.
The bold characters note the CESR selector of the part.
Nested mode
Over time, sustained message exchanges enable external observers to gather and analyze significant data. To counter this threat, TSP prvoides a technique to encapsulate a specific conversation within an additional TSP envelope.
To try out TSP in nested mode, the command line interface can be used. A nested relationship can be set up by exchanging relationship messages (the preferred way), but it can also be tested by manually setting up identifiers, having both sides explicitly verify each other’s identities and establishing a relationship between those identifiers.
Nested mode (using relationship control messages)
Establishing an outer relationship
To send a nested TSP message, both sender and receiver should first establish a direct relationship. This can be initiated by one party verifying the VID of the other and sending a relationship request.
We use the same alice and bob aliases as in the previous chapter.
First, alice will have to learn about bob's existence:
> tsp -w alice verify --alias bob did:web:did.teaspoon.world:endpoint:bob
 INFO tsp: did:web:did.teaspoon.world:endpoint:bob is verified and added to the wallet alice
Then she can send a relationship request message. This requires bob to be listening as
shown in the previous chapter (i.e., running tsp -w bob receive bob --one in a separate window):
> tsp -w alice request --sender-vid alice --receiver-vid bob --wait
 INFO tsp::async_store: sending message to https://did.teaspoon.world/endpoint/bob
 INFO tsp: sent relationship request from did:web:did.teaspoon.world:endpoint:alice to did:web:did.teaspoon.world:endpoint:bob, waiting for response...
On bob's side, we will see:
> tsp -w bob receive --one bob
 INFO tsp: listening for messages...
 INFO tsp: received relationship request from did:web:did.teaspoon.world:endpoint:alice, thread-id 'JZla6+N6FP/In7ywOp8yQD2GfXemCn1e4b6tFVWaLxg'
Notice how a thread-id was generated; we need this to confirm the relationship. This can be done by sending a relationship acceptance message (this requires alice to be listening, which the CLI does automatically after sending a relationship request):
> tsp -w bob accept --sender-vid bob --receiver-vid alice --thread-id 'JZla6+N6FP/In7ywOp8yQD2GfXemCn1e4b6tFVWaLxg'
On alice's side, this will look like:
INFO tsp: received accept relationship from did:web:did.teaspoon.world:endpoint:bob
alice and bob now have a bidirectional relationship.
Nesting the relationship
To establish the nested relationship follows the same procedure as above, except that the request and accept subcommands will
have to be passed the --nested parameter.
Let's say that alice again takes the initiative to nest the relationship, which starts the same as before:
> tsp -w alice request --nested --sender-vid alice --receiver-vid bob --wait
 INFO tsp: sent a nested relationship request to did:web:did.teaspoon.world:endpoint:bob with new identity 'did:peer:2.Vz6Mv3HRDr8nQ28LZxXHrU1zaUdXVJVjQzhuVcFB4pyF5rweQ.Ez6Lc6URPHMVN1vswnk32ND5zNcAb5o2QA1Hs4NThH2YzAuVL.SeyJzIjp7InVyaSI6InRzcDovLyJ9LCJ0IjoidHNwIn0'
Notice that a new did:peer identifier was created. This will have a transport set to tsp://. Let's create an alias for it:
On bob's side, this message will appear:
> tsp -w bob receive bob --one
 INFO tsp: received nested relationship request from 'did:peer:2.Vz6Mv3HRDr8nQ28LZxXHrU1zaUdXVJVjQzhuVcFB4pyF5rweQ.Ez6Lc6URPHMVN1vswnk32ND5zNcAb5o2QA1Hs4NThH2YzAuVL.SeyJzIjp7InVyaSI6InRzcDovLyJ9LCJ0IjoidHNwIn0' (new identity for did:web:did.teaspoon.world:endpoint:alice), thread-id 'cR9RznAELgbp9XZ+VFFjq7vYv4v+ITaGrxa7L2ddCPw'
As before, bob can accept this using tsp accept:
> tsp -w bob accept --nested --sender-vid bob --receiver-vid did:peer:2.Vz6Mv3HRDr8nQ28LZxXHrU1zaUdXVJVjQzhuVcFB4pyF5rweQ.Ez6Lc6URPHMVN1vswnk32ND5zNcAb5o2QA1Hs4NThH2YzAuVL.SeyJzIjp7InVyaSI6InRzcDovLyJ9LCJ0IjoidHNwIn0 --thread-id 'cR9RznAELgbp9XZ+VFFjq7vYv4v+ITaGrxa7L2ddCPw'
 INFO tsp: formed a nested relationship with did:peer:2.Vz6Mv3HRDr8nQ28LZxXHrU1zaUdXVJVjQzhuVcFB4pyF5rweQ.Ez6Lc6URPHMVN1vswnk32ND5zNcAb5o2QA1Hs4NThH2YzAuVL.SeyJzIjp7InVyaSI6InRzcDovLyJ9LCJ0IjoidHNwIn0 with new identity 'did:peer:2.Vz6MuvAXTdNjiSV4DkbMUXAzShqiL2wvFNf2Dg4mr34JkQqk6.Ez6LbyVXwzoVNbRVm7X1Bpa4BqM5Aa5QYXyT4j6iRCxJAo4Fc.SeyJzIjp7InVyaSI6InRzcDovLyJ9LCJ0IjoidHNwIn0'
Instead of the did:peer, bob could also have used alice's outer VID here. The TSP SDK will know which VID to use. Notice
how a new VID was also generated for bob. On alice's side, this will look as follows:
INFO tsp: received accept nested relationship from 'did:peer:2.Vz6MuvAXTdNjiSV4DkbMUXAzShqiL2wvFNf2Dg4mr34JkQqk6.Ez6LbyVXwzoVNbRVm7X1Bpa4BqM5Aa5QYXyT4j6iRCxJAo4Fc.SeyJzIjp7InVyaSI6InRzcDovLyJ9LCJ0IjoidHNwIn0' (new identity for did:web:did.teaspoon.world:endpoint:bob)
Note that to make operation easier, we recommend using the alias mechanism to create better names for these essentially random inner identifiers:
> tsp -w alice set-alias inner_alice did:peer:2.Vz6Mv3HRDr8nQ28LZxXHrU1zaUdXVJVjQzhuVcFB4pyF5rweQ.Ez6Lc6URPHMVN1vswnk32ND5zNcAb5o2QA1Hs4NThH2YzAuVL.SeyJzIjp7InVyaSI6InRzcDovLyJ9LCJ0IjoidHNwIn0
> tsp -w alice set-alias inner_bob did:peer:2.Vz6MuvAXTdNjiSV4DkbMUXAzShqiL2wvFNf2Dg4mr34JkQqk6.Ez6LbyVXwzoVNbRVm7X1Bpa4BqM5Aa5QYXyT4j6iRCxJAo4Fc.SeyJzIjp7InVyaSI6InRzcDovLyJ9LCJ0IjoidHNwIn0
And similarly for bob. Using these aliases, nested messages can simply be sent as for any other VID:
echo "Hello Bob" | tsp -w alice send --sender-vid inner_alice --receiver-vid inner_bob
Nested mode (manual setup)
To send a nested TSP message, both sender and receiver should establish a pair of VIDs. One VID is used for the inner message and one for the outer.
We use the same alice and bob example as in the previous chapter.
First, we create an inner or nested VID for alice:
tsp -w alice create --type peer alice-inner
Output:
 INFO tsp: created peer identity did:peer:2.Vz6Mv1MHPrewz2y6ntLZwbWdMc2C3Ny6Tk
 hA8mQouGsvNEgDK.Ez6Lbs5PeCs6VCbCjnPFV412nS3SDqjnHYB8sLB69XFQwUUkF.SeyJzIjp7In
 VyaSI6Imh0dHBzOi8vdHNwLXRlc3Qub3JnL3VzZXIvYWxpY2UtaW5uZXIifSwidCI6InRzcCJ9
This command creates a new identity and key material in the did:peer format.
Next, we configure the newly created did:peer as a child of our main identity:
tsp -w alice set-parent alice-inner alice
Output:
 INFO tsp: did:peer:2.Vz6MutdCU73wbCRc4Uypzg1a3gU5vAfwsLjHWbgArHzjqWzpw.Ez6Lbwx
 U56UYuE9EwTPgVJFX2nB3UcssbLk7nnrEF8qQNEZQv.SeyJzIjp7InVyaSI6Imh0dHBzOi8vdHNwLX
 Rlc3Qub3JnL3VzZXIvYWxpY2UtaW5uZXIifSwidCI6InRzcCJ9
 is now a child of did:web:did.teaspoon.world:endpoint:alice
We do the same for bob:
tsp -w bob create --type peer bob-inner
Output:
 INFO tsp: created peer identity did:peer:2.Vz6Mv49Sf4ui8iG5C7VTjMS2bXq7EZDhyK
 SDNbcQhcvUmGLLW.Ez6Lc2RywGrd9ARMmfLBGL3QFsoijt1PmYMMFrPRk6QMfwTEr.SeyJzIjp7In
 VyaSI6Imh0dHBzOi8vdHNwLXRlc3Qub3JnL3VzZXIvYm9iLWlubmVyIn0sInQiOiJ0c3AifQ
tsp -w bob set-parent bob-inner bob
Output:
 INFO tsp: did:peer:2.Vz6Mv49Sf4ui8iG5C7VTjMS2bXq7EZDhyKSDNbcQhcvUmGLLW.Ez6Lc2R
 ywGrd9ARMmfLBGL3QFsoijt1PmYMMFrPRk6QMfwTEr.SeyJzIjp7InVyaSI6Imh0dHBzOi8vdHNwLX
 Rlc3Qub3JnL3VzZXIvYm9iLWlubmVyIn0sInQiOiJ0c3AifQ
 is now a child of did:web:did.teaspoon.world:endpoint:bob
Next we resolve and verify bob's inner VID. We use the print command to print
the full VID and use xargs to feed the output as input for the verify command:
tsp -w bob print bob-inner | xargs tsp -w alice verify --alias bob-inner
Output:
 INFO tsp: did:peer:2.Vz6Mv49Sf4ui8iG5C7VTjMS2bXq7EZDhyKSDNbcQhcvUmGLLW.Ez6Lc2
 RywGrd9ARMmfLBGL3QFsoijt1PmYMMFrPRk6QMfwTEr.SeyJzIjp7InVyaSI6Imh0dHBzOi8vdHNw
 LXRlc3Qub3JnL3VzZXIvYm9iLWlubmVyIn0sInQiOiJ0c3AifQ
 is verified and added to the wallet alice
We do the same for the inner VID of alice:
tsp -w alice print alice-inner | xargs tsp -w bob verify --alias alice-inner
Output:
 INFO tsp: did:peer:2.Vz6MutdCU73wbCRc4Uypzg1a3gU5vAfwsLjHWbgArHzjqWzpw.Ez6Lbw
 xU56UYuE9EwTPgVJFX2nB3UcssbLk7nnrEF8qQNEZQv.SeyJzIjp7InVyaSI6Imh0dHBzOi8vdHNw
 LXRlc3Qub3JnL3VzZXIvYWxpY2UtaW5uZXIifSwidCI6InRzcCJ9
 is verified and added to the wallet bob
We need to configure the association between alice and bob's inner VIDs.
Use the request command to specify which VID should be used to send messages
a certain VID:
tsp -w alice request --sender-vid alice-inner --receiver-vid bob-inner
Then set the parent/child relationship of bob's VIDs in alice's wallet:
tsp -w alice set-parent bob-inner bob
Now we are ready to send a nested message. First start listening for messages from bob's side:
tsp -w bob receive --one bob
Then send a nested message from alice:
echo "Hi Bob!" | tsp --verbose -w alice send -s alice-inner -r bob-inner
Output:
 INFO tsp::async_store: sending message to https://demo.teaspoon.world/endpoint/did:web:did.teaspoon.world:endpoint:bob
CESR-encoded message:
-EABXAAA9VIDAAALAAAZGlkOndlYjp0c3AtdGVzdC5vcmc6dXNlcjphbGljZQ8VIDAAAKAAZGlkOnd
lYjp0c3AtdGVzdC5vcmc6dXNlcjpib2I4CC2TF93f5Igkjgp4feBYOas18w-GhN_Q7oCRNStEbbdVK
aN7Uqr2DK3-A3xf7b9px6KchftsEsIx7AM2fVO1V4KJ8OixmVPoPK59q9TpoioCiL2XmmZLT3Gj4X0
MIbYCIyJWSBQNwVyH3h434Ja86xSx8rR87H48sX9MtKSgRwkP_iU4FiJOzg27vIUVtzLZacp2Bwvti
p_WATvkQm4uecQwb-0dCpC8x_TjDyyARLglahjQrz2DPImn-_UzJKZqv1kqLKTED0dD-7WqOtY-1Ll
gasteOVKQlH6DtcvNPqUCWnZJtT0vJvpVpogeQ_5Ky_WdPRflUOyic4lE93lbDgPWxGdZ5Qnu8lTG3
XntZMCLh95r89hr6oTMJwQoWdlS0NEH-UEQt2NLxeYwXH_rG0uoZW2k4YC1PvmJ5zdAhW721IkSuKg
y0STK0eDk4q0EZagBn4iFUnye1m34TZb5F7hmzVmNolhgojXmPmT9PdC8a90Z6c-AS9xYHVZHkUjF2
gYPuYHu6RdKJ8fT2OZJ_hbfBXeYHA6-hloFBHqLMShCGFZKrY6uw6dWZ6DB96WRa0ubakV3fDDNyLu
Rol52q133vSkgspyN7hYEtUEojnOyrOVsX8yrVoONHxCZ-3g1oe6LJNnLC8CxmF2n1-WQgvaQBwj3Q
a8EQDX0n2VWnhG0xWZeclCG54qJSC6YEiNS1XGfe6m2ZFEWqmLZDmr1PbxhO4m0BA9BEqEHLumN0cx
ip0iXo-yHjrA5EP_ka8Y4pkQdTpr5yJZJqHjyThVwgvbbQX9ORRND-qV6Tl0MRcJ8lTWAhbDw
 INFO tsp: sent message (8 bytes) from did:peer:2.Vz6MutdCU73wbCRc4Uypzg1a3gU5
 vAfwsLjHWbgArHzjqWzpw.Ez6LbwxU56UYuE9EwTPgVJFX2nB3UcssbLk7nnrEF8qQNEZQv.SeyJz
 Ijp7InVyaSI6Imh0dHBzOi8vdHNwLXRlc3Qub3JnL3VzZXIvYWxpY2UtaW5uZXIifSwidCI6InRzc
 CJ9 to did:peer:2.Vz6Mv49Sf4ui8iG5C7VTjMS2bXq7EZDhyKSDNbcQhcvUmGLLW.Ez6Lc2Ryw
 Grd9ARMmfLBGL3QFsoijt1PmYMMFrPRk6QMfwTEr.SeyJzIjp7InVyaSI6Imh0dHBzOi8vdHNwLXR
 lc3Qub3JnL3VzZXIvYm9iLWlubmVyIn0sInQiOiJ0c3AifQ
The output on bob's end:
 INFO tsp: listening for messages...
 INFO tsp: received message (8 bytes) from did:peer:2.Vz6MutdCU73wbCRc4Uypzg1a3
 gU5vAfwsLjHWbgArHzjqWzpw.Ez6LbwxU56UYuE9EwTPgVJFX2nB3UcssbLk7nnrEF8qQNEZQv.Sey
 JzIjp7InVyaSI6Imh0dHBzOi8vdHNwLXRlc3Qub3JnL3VzZXIvYWxpY2UtaW5uZXIifSwidCI6InRz
 cCJ9
Hi Bob!
Routed mode
Like nested mode, routed mode can be set up by exchanging relationship messages between every hop in the node (for the most part), or more manually. Here, we will assume a setup with four nodes: a sender a, receiver b, and two intermediaries p and q.
In this document, we will use the CLI to simulate intermediaries. We also have a stand-alone example intermediary server, which we will discuss in the next chapter.
Routed mode (semi-automated set up)
To set up routed mode, the four nodes need to establish bidirectional outer relationships with each other using tsp request and
tsp accept, as shown in the chapter on nested mode. We will not repeat instructions on how to do that here and assume that all the one-to-one relationships have already
been formed.
What is special about routed mode, is that the final hop node q, needs to have a special VID (say q2) that is dedicated to sending
messages to the final recipient b. This can be achieved in two ways:
-
Establishing a nested relationship between
qandb, and then using the inner VID forqas the final hop. Nested relationships always have a "relation vid". -
Explicitly creating a separate public identity for the node
qthat is verified byband hasbas its "relation vid":> tsp -w q create --alias q2 q2 > tsp -w q request --sender q2 --receiver b
When this set up is done, the only thing left to send a routed message from a to b, is to set up a route.
tsp -w a set-route b VID-FOR-P,VID-FOR-Q,VID-FOR-Q2
Note, this requires a to have verified the VID of p, but it does not need to have verified the VID's q or q2. In fact, if
the VID q2 is an inner vid for a nested relationship, a will not have a way to verify it at all.
When this route is set up properly, sending a message proceeds as normal:
echo "Routed Hello" | tsp -w a send --sender-vid a --receiver-vid b
Routed mode (manual set up)
Routed mode is a bit more involved than direct or nested mode. We need to set up correctly configured intermediary servers.
In this example we use preconfigured intermediaries from teaspoon.world instead of using the TSP CLI itself for the intermediaries.
We will use intermediaries p and q to send a message from a to b.
Here's an overview of what this looks like:
┌────────────────┐   ┌────────────────┐
│                │   │                │
│ Intermediary P ├──►│ Intermediary Q │
│                │   │                │
└────────────────┘   └────────┬───────┘
        ▲                     │
        │                     ▼
┌───────┴────────┐   ┌────────────────┐
│                │   │                │
│ A (sender)     │   │ B (receiver)   │
│                │   │                │
└────────────────┘   └────────────────┘
Set up sender and receiver identities
Let's create two identities a and b such that a talks through intermediary p and b talks through intermediary q. The --server determines which server the clients use for transport:
tsp -w a --server p.teaspoon.world create a --type web --alias a
tsp -w b --server q.teaspoon.world create b --type web --alias b
You may need to use different usernames if a and/or b already exist on the DID server.
Introduce the nodes to each other
The sender a resolves and verifies the receiver b:
tsp -w b print b | xargs tsp -w a verify --alias b
The sender a also resolves and verifies the first intermediary p, and requests a relationship with this intermediary:
tsp -w a verify did:web:p.teaspoon.world --alias p
tsp -w a request -s a -r p --wait
Our public demo intermediaries are configured to accept all incoming relationship requests.
The receiver b resolves and verifies the second intermediary q, and requests a relationship with this second intermediary:
tsp -w b verify did:web:q.teaspoon.world --alias q
tsp -w b request -s b -r q --wait
In order for the final drop-off to work, b needs to set up a nested relation with q, otherwise q would have no way of knowing were to deliver the message to in the last hop. The following command will read the nested DIDs into the bash environment variables DID_B2 and DID_Q2:
read -d '' DID_B2 DID_Q2 <<< $(tsp -w b request --nested -s b -r q --wait)
echo "DID_B2=$DID_B2"
echo "DID_Q2=$DID_Q2"
Send a message
Now that we have set up all the relations between the nodes, we can configure the route for messages that are to be delivered from a to b. We will route these messages via p to q, and then q2 will drop it off at b:
tsp -w a set-route b "p,did:web:q.teaspoon.world,$DID_Q2"
Sending the routed message is trivial, now we have configured the relations and route.
Let b listen for messages:
tsp -w b receive b
Let a sent a message:
echo "Hi b" | tsp --verbose -w a send -s a -r b
Output:
 INFO tsp::async_store: sending message to https://p.teaspoon.world/transport/did:
 web:p.teaspoon.world
CESR-encoded message:
-EABXAAAXAEB9VIDAAAdAAAZGlkOndlYjpyYXcuZ2l0aHVidXNlcmNvbnRlbnQuY29tOm9wZW53YWxsZXQ
tZm91bmRhdGlvbi1sYWJzOnRzcDptYWluOmV4YW1wbGVzOnRlc3Q6YQ7VIDAAAIZGlkOndlYjpwLnRlYXN
wb29uLndvcmxk4CDBRPjQTLqVsN-QrMR5eVGgSO0Q6V491-GKJP7imcKJheAT1_madw21FHK49oJvINRYt
1GZX4dtZGCC5gB1EZCLZpqQJjzeuwQavXYUFBY3z3ygNw-780r4fltOtjVG0hybe8Y5YOf4rv1U_xD-Ajm
xbw7rOlJq7AWojJq2FbWQ6Ho2z90KUwQ8ki-hyYCE1woCDM1TAQu3Pvt8XsrRqr5TpeExIlh1Jx_vlt-rW
Dny4nbBv7SWHEovVBT7XXtVPWpEnBiBzm2mBsJ5CZsDy-EjXVONCEadUwDwwYaU8djEYt8pBHag8IGlpVZ
IUN2dtZyFhRKmvq7FsEcqSCpiSZR7jXiHNjghqUCBFwAIqwnAr1npW15fg7lREpiLTkcs8oSSZvmEhLaFT
BvhnhFvCzTP-CckvhFXOsUpK7Q5u3KBRFReEQYb32CfEq44yaKRVUAVknXJmS_HBOWv-VbnbgR-8q8TL5z
h2rOH2pGM8sQVlweWBg32JmACWzdOw2jCF17Ey4AYFQkYbiz8extJuAxg22aoE30azL-RU0I0bGW-ZCqLx
mK8jLH_zoYZ35nTQfwZYlFfe-cbempzw9gS685RloYBSKq9kdPIsV7h3DW-vBwEP6_ttaS024F2ZW90KMq
vQ3pRNr5pjmxWshlerIBjRcpTO7IjIYN6jU1Vg8-akcukC0J8vu8GJYZhu5n16DYAAcqQkmKmsTBD8OirJ
FldrEVWc1F5Bu0zd3FJuYq7K5OdQgw4JFrRPUgeVNIRCsdElnQP0BAYPtmDPJDfhx_-ab02_y2yD1FrhXE
SrBAkd6evt2M2Z2ugVyVwxTU-pVVXlcTa5p_-N05lWEZ0bdUBdR4upMUDA
 INFO tsp: sent message (5 bytes) fromdid:web:raw.githubusercontent.com:openwallet
 -foundation-labs:tsp:main:examples:test:a to did:web:raw.githubusercontent.com:
 openwallet-foundation-labs:tsp:main:examples:test:b
Note that the message is longer than a direct mode message, since the ciphertext contains another TSP message.
The cli-demo-routed-external.sh script in the examples/ folder performs all the previously described steps automatically. One small difference is that in the script a and b use https://demo.teaspoon.world/ for transport, while the identities from the step-by-step tutorial above are configured to use intermediaries directly.
Debug intermediaries
The example intermediary servers p and q maintain a brief log of recent events,
see https://p.teaspoon.world/ and https://q.teaspoon.world/ after sending a routed message.
See also the documentation for intermediary servers.
Intermediary server
In the context of the TSP an intermediary server routes TSP messages. See the specification. This document provides some guidelines on how to set up an intermediary.
Example
The directory examples/ contains the source code for an example
intermediary server, see examples/src/intermediary.rs.
This server listens on a specified port and starts a web server to accept TSP messages over an HTTP(S) transport. A receiver (client) can set up a websocket connection to this intermediary to be able to receive messages when no public address can be exposed, behind a firewall.
Public demo intermediaries
We host two demo intermediaries publicly for testing:
- Intermediary P, which has the identifier
did:web:p.teaspoon.world - Intermediary Q, which has the identifier
did:web:q.teaspoon.world
These two instances both run the examples/src/intermediary.rs server. These intermediaries also support buffering messages, which means they are able to hold messages for clients which are not currently listening (although there are no guarantees for how long the message will be held).
The cli-demo-routed-external.sh script in the examples/ directory creates two local end-points A and B, and then sends a message from A to B via the public intermediaries P and Q. To do this, it first sets up relations between A and P and between B and Q. Additionally, for the final drop-off to work, B creates a nested relation between B and Q, resulting into two nested DIDs B2 and Q2. The final route of the message from A then becomes P,Q,Q2, where Q2 will drop off the message at B2.
For a step-by-step example of how you can send a message over the intermediaries using the CLI, see the documentation page about routed mode.
Running demo intermediaries locally
You can also run your own intermediaries servers on localhost. To get HTTPS to work, we use an SSL proxy using the certificates in the examples/test/ folder. You can start this proxy by running the following command in the examples/test/ folder:
npx local-ssl-proxy --config ./ssl-proxy.json
We use the feature flag use_local_certificate to load in the certificates used by the proxy into the intermediary and the CLI. Run the following two commands in two separate terminals to start intermediaries P and Q locally:
cargo run --features use_local_certificate --bin demo-intermediary -- --port 3011 localhost:3001
cargo run --features use_local_certificate --bin demo-intermediary -- --port 3012 localhost:3002
This runs the intermediaries on http://localhost:3011/ and http://localhost:3012/. The SSL proxy makes these accessible via HTTPS at https://localhost:3001/ and https://localhost:3002/, so DIDs we should use are did:web:localhost%3A3001 for P and did:web:localhost%3A3002 for Q.
The cli-demo-routed-local.sh script in the examples/ directory creates two local end-points A and B, and sends a message from A to B via the local intermediaries P and Q. This works the same as the demo using our publicly accessible intermediaries.
TSP library usage for intermediaries
An intermediary can use the same interface as other TSP-Rust applications,
namely the SecureStore or the AsyncSecureStore. Use the AsyncSecureStore as a high-level
interface, with built-in transport methods. Use the SecureStore if you have different
or specific transportation methods and only use this crate to seal and unseal TSP messages.
An intermediary basically needs to hold key material of its endpoints and forwards/routes
messages. To add / manage endpoint key material use the default store methods, like
add_verified_vid or verify_id. The server itself also needs an identity and
key material. Populate a store to manage these identities.
The primary method to route messages is route_message
which takes a sender and a receiver vid (string slice) and an owned message as bytes.
In the AsyncSecureStore this method will send the resulting message immediately,
in the SecureStore it will return the new message as bytes, in which case the
caller needs to send the message over a (custom) transport.
Note that the sender/receiver VIDs of an incoming message get be retrieved using
tsp::cesr::get_sender_receiver. Another method that might be useful is
has_private_vid to check whether an incoming message is actually addressed to
the current intermediary.
Hosting
Currently, there are free, publicly reachable demo services deployed that you may use for development and testing. Please be aware that they do not provide any guarantees on uptime or data persistence. The domains for the various servers are as follows:
- Demo server with web GUI: https://demo.teaspoon.world
- DID:WEB server to create and resolve DIDs: https://did.teaspoon.world
- Intermediary P: https://p.teaspoon.world
- Intermediary Q: https://q.teaspoon.world
Self-hosting
If you prefer to host your own instances, we provide all the resources to run a local deployment in docker compose or a cloud-based deployment with Google Cloud Run.
Docker compose
The easiest way to run the different components on the local machine is to execute start the docker compose file in the
root of the repository.
The docker compose deployment uses the local certificate included in the code base to enable HTTPS connections.
Therefore, you must enable the use_local_certificate feature flag when compiling the TSP CLI.
Otherwise, you will receive an "Unknown Certificate" error.
# the `-d` option starts the containers in the background.
docker compose up -d
Google Cloud Run
To deploy the demo applications in your own Google Cloud environment, you can either build your own Docker images
or rely on pulling them from GitHub.
To build the images yourself, use the --target flag to specify which image to build.
docker build --target did-web . -t your-custom-tag/did-web:version
docker build --target server . -t your-custom-tag/server:version
docker build --target intermediary . -t your-custom-tag/intermediary:version
Further, you need a Google Cloud Run instance and at least the "Cloud Run Developer", "Artifact Registry Reader", and "Cloud Run Developer" access rights. The repository contains Knative configuration templates that can be deployed directly to Google Cloud Run.
gcloud run services replace <filled_in_template> --project <your_project>
TSP SDK Design Overview
Introduction to TSP
TSP (Trust Spanning Protocol) is an interoperability layer protocol for two communicating endpoints to establish and maintain a trust relationship. TSP enables endpoints to cryptographically verify each other's identifiers. Such identifiers are therefore called Verifiable Identifiers (VID). There can be many verifiable identifiers including many legacy identifiers in common use today but also newly designed identifiers for strong verifiability. It is up to the applications to decide and choose what identifiers are considered sufficiently verifiable.
flowchart LR
    ida(Endpoint A with VID_A)<-. Trust Spanning Protocol .-> idb(Endpoint B with VID_B)
As an interoperability protocol, we try to minimize the features in TSP to those that are essential for an effective trust relationship over an untrusted network environment, such as the public Internet, and leave other functions to be implemented in a higher layer. The features included in TSP are:
- Authenticity: From whom the message is sent and to whom (only). The message has not been tampered.
- Confidentiality: Except for the sender, only the identified receiver can read the message.
- Meta-data privacy: TSP also offers context privacy protection (e.g. Internet meta-data) mechanisms, including protections through untrusted intermediaries.
TSP chooses a common three layer approach similar to the Internet. The three layers are, from bottom to top, the transport layer, the spanning layer, and the trust task layer.
graph TD;
    Trust_Task_1-->TSP;
    Trust_Task_2-->TSP;
    Trust_Task_3-->TSP;
    TSP-->Transport_1;
    TSP-->Transport_2;
    TSP-->Transport_3;
The above diagram explains why it is called the Trust Spanning Protocol. By adopting a common TSP layer, applications or trust tasks of different implementations or designs may approach interoperability while maintaining trust.
Modules
The TSP SDK has several goals: we want to provide a good implementation of TSP in Rust that can be used in a lower level as a communication protocol and in a higher level that also includes its wallet and local states; we want language bindings to languages commonly needed in the applications; we want to provide some of common VIDs, transports, and trust tasks; we also want to implement a useful testbed for developers.
Here is a list of main software modules:
- A TSP SDK implemented in Rust as the core module, including TSP the communication protocol and the necessary wallet and local states.
- A subset of the above for application who only wants an implementation TSP the communication protocol.
- Various language bindings of the TSP SDK: Python, Javascript, Node.js
- A selection of supported VIDs:
did:peer,did:web,did:webvh - A selection of supported transports: HTTP (with WebSockets), TLS, QUIC, TCP
- A CLI for testing endpoints
- A cloud based testbed hosted at
teaspoon.world.
The SDK of course provides convenient ways that any developer can add additional VID types, transport mechanisms, language bindings, and most importantly trust tasks or applications.
A Testbed
The following diagram illustrates the layout of nodes simulated in the testbed. It is designed to make most, but not all of course, of common tests easier for developers. It is used by all unit and regression tests by developers.
flowchart LR
    id1(Endpoint A) --- id2(Intermediary P.teaspoon.world) --- id3(Intermediary Q.teaspoon.world) --- id4(Endpoint B)
    id1 --- id4
As shown above, the two endpoints A and B can communicate through TSP directly or through the intermediaries. Not shown in the diagram (for simplicity) is the case where there is only one intermediary between them.
Also, not shown but provided by the testbed is a Support System did.teaspoon.world for VID verification, and an Out Of Band discovery site www.teaspoon.world.
The endpoints may be simulated in the testbed, but a more useful way is to run endpoints locally using the provided CLI.
The testbed is provided for contributing developers only. Please contact project maintainers in the Discord channel for access. The testbed is limited in its capacity of course and is not reliable for anything other than testing.
TSP SDK Technical specification
This document tries to focus on aspects that pertain to the SDK; i.e. how the TSP Specification impacts the design choices for the Rust SDK. Since the TSP Specification is still in the process of being finalized, however, there may be some duplication.
Protocol overview
At its core, TSP consists of "simply sending a message" between parties; except that this message is (often) encrypted and (always) signed. In this way the parties have confidence that any messages received are always by the same entity, and trust can be built.
TSP uses Verified Identifiers to designate the sender and receiver of messages. A mechanism out of scope for this project (but that we will have to write some simple examples of) will allow applications to retrieve addresses and public keys for a VID.
A TSP message therefore contains at least the following information:
- Who is the originating sender?
- Who is the intended receiver?
- A message payload (encrypted or unencrypted), which can either be 'simple content' or a Control Message.
- A signature
So, a confidential message will conceptually look like this:
And a non-confidential message, when there is no receiver VID, will look like this:
Modes of operation
-
Direct mode: TSP messages can be exchanged directly between two parties via publicly known VID's ("Well-Known VID's"); that gives confidentiality and authenticity but not much privacy.
-
Nested mode: TSP messages can be exchanged as the 'payload' of another TSP message using not-publicly known VID's. Such a nested connection is established via TSP Control Messages. This gives a little bit more privacy.
-
Routed mode: TSP messages can be routed through intermediaries to further hide the fact that two parties are communicating. This is done by parties first establishing "nested" communication lines between every involved party and then sending a message that spans over those nested communications lines.
High-level architecture
The SDK will consist of functions that can be called by an application to completely perform all TSP-specific operations, such as:
- Generating/retrieving/storing VID's
- Control operations on a private key associated with a VID
- Obtaining transport layer address information and other metadata from a verified VID.
- Creation and processing of TSP messages
This allows applications the flexibility to incorporate TSP in an existing setup: i.e., an application can create a TSP message but chose by itself how and when to send it.
For other use cases, the SDK will also contain some convenience functions such as "generate-and-send" for some common transport layers (such as HTTPS or QUIC) for applications that don't need this flexibility.
SDK General Requirements
Cryptography
| _ | Description | Rationale | Consequence |
|---|---|---|---|
| C1 | Encryption primitives chosen have to be IND-CCA2 secure | This is the strongest notion of security: under an adaptive chosen ciphertext attack, the attacker cannot recognize correct ciphertext. | We use HPKE-Auth for encryption, a modern asymmetric "weakly authenticated" encryption standard |
| C2 | Signature schemes have to be SUF-CMA secure | This is the strongest notion of unforgeability, meaning an attacker cannot create valid signatures themselves even if given a "signing oracle". | Ed25519 will be used for creating non-repudiation signatures in TSP messages. |
| C3 | Cryptographic code has to be reliable | TSP relies heavily on cryptography being reliable, and we should not write these ourselves. | For crypto "back-ends", code will come from the RustCrypto and DALEK projects. We avoid ring due to maintenance issues and libsodium since its Rust binding has been deprecated by its maintainer. |
| C4 | TSP must be resilient against key compromise events | If a private key is leaked, the goal of TSP is compromised | The SDK will not have an API for providing the private key of a VID to an application. Furthermore, HPKE is used that offers more protection against KCI. |
Interoperability
| _ | Description | Rationale | Consequence |
|---|---|---|---|
| I1 | The implementation must only use third-party dependencies that are "well adopted" by the Rust community and actively maintained. | This will "future-proof" the SDK by reduce the chance that the SDK will rely on code that will be abandoned, or that it will be unpopular by requiring uncommon dependencies. | Before taking a dependency, we check its activity status and number of downloads. In particular, we will have to write our own CESR support libraries. |
| I2 | TSP messages must support CESR encoding | CESR encoding is important for credibility in the wider Trust-over-IP community and interoperability with KERI | TSP messages will be formatted using CESR |
| I3 | TSP messages must be capable of being easily generated and parsed in wide variety of contexts | TSP must be a general protocol | TSP will use CESR in the "B" domain as the canonical representation that will be signed, since that reduces the impact of the choice for CESR. |
| I4 | The TSP SDK must be usable by programs not written in Rust | Rust is a secure language, but not a "lingua franca" | Bindings will be written to make the SDK usable from C, Python and JavaScript. |
| I5 | The SDK must not impose unduly restrictive limitations of use | This allows for easier adoption by existing applications | TSP message creation/processing and sending/receiving will be split up in different functions. |
TSP Specification Conformance
| _ | Description | Rationale | Consequence |
|---|---|---|---|
| S1 | TSP can be run over many different transport protocol | TSP must be a flexible protocol | Code will be designed so it is not tightly tied to a single transport layer. |
| S2 | The SDK will support "direct mode", "nested mode" and "routed mode" | This is essential for achieving TSP's aims | Some design discussion around control messages setting up routed mode will be needed in the future. |
Verified Identifiers
| _ | Description | Rationale | Consequence |
|---|---|---|---|
| V1 | VID can contain no identifying information, with the exception of "Well Known VIDs" | Non-correlation of VID's is required by the TSP spec | Cryptographic means and entropy means must be used for creating unpredictable "inner VIDs" |
| V2 | VID is a probabilistically unique identifier | There must be an extremely low change of two VID's being the same; but this chance cannot be made 0 | An "inner VIDs" must represent at least 128 bits of entropy |
| V3 | The specific style of VID is out of scope | This is part of the TSP "support system" | We need to model an interface for VID's at a sufficiently usable and abstract level; and pick a sufficiently general type of VID for the demo application. |
| V4 | A verified VID can be resolved to a pair of public encryption and public verification keys | VIDs are used instead of public keys in TSP | In the SDK, a known VID has been resolved to a pair of public keys |
| V5 | A verified VID can be resolved to a "transport layer address" | TSP is a communication protocol | In the SDK, a known VID has been resolved to a form of resource locator such as an e-mail address or URI. |
| V6 | A verified VID may also provide additional information about the entity it identifies | This is what identifiers are typically used for (see DID and X509) | The VID interface must support this |
| V7 | The information about resolved VID's in the TSP SDK must be treated as confidential and securely stored | This "routing information" links VIDs to addresses and public keys and can compromise the non-correlation requirement for VID's | This information will be stored in a secure manner (such as in a secure wallet) |
| V8 | TSP messages may also be "broadcast", without a designated received | This is under consideration in the TSP specification | Our SDK will support the creation of TSP broadcast messages. |
Demo
| _ | Description | Rationale | Consequence |
|---|---|---|---|
| D1 | The demo must be a good example of how to use the SDK | TSP is easier to adopt if developers can 'copy code' | The "trust application" side of the demo must not be fairly simple. |
| D2 | The demo must be able to demonstrate the particular features of TSP | This will make it easier to understand what TSP achieves | The demo must involve the three pillars of TSP: confidentiality, authenticity, and privacy. |
Security properties
The goal of TSP is to provide security guarantees for
- Authenticity
- Confidentiality
- Privacy
of communication between two parties.
Privacy in communication can be optionally enabled by using the "Routed" mode of the TSP protocol.
To get a high degree of confidence, a modern and well-analyzed cryptographic standard for signcryption is chosen. In signcryption asymmetric cryptography is used to encrypt and sign the contents of a message.
Hybrid Public Key Encryption (HPKE, RFC 9180) is a robust method of signcryption using modern cryptographic primitives 1. It combined a "Key encapsulation Mechanism", with a "Key Derivation Function" and primitive for "Authenticated encryption with associated data" to combine asymmetric with symmetric cryptography, to obtain certain security and performance characteristics. HPKE offers the highest notion of confidentiality, namely IN-CCA2.
HPKE offers the possibility to create authenticated plaintext and authenticated ciphertext in one signcryption operation. In TSP a header (containing the sender and receiver VID's) must be authenticated but not encrypted.
Although HPKE offers authentication and confidentiality between two parties, there are two characteristics that are not desirable for TSP:
- HPKE is vulnerable to key compromise impersonation (KCI). Which means that if Bob's private key is leaked to Eve, Eve can impersonate Alice toward bob.
- Although two parties communicating can verify the authenticity of messages, an outsider cannot verify that, for instance, the sender as specified in the header of the message really sends the message. Thereby a receiver can also not prove a message was sent by a particular sender to them. This is called receiver unforgeability (RUF).
The overcome to above, an additional signature is created over both the header and the (HPKE) ciphertext of a TSP message. Since both the sender and receiver's VID are present in the header of a message, one can always verify the message was created by the specified sender and that it was intended for the specified receiver. This is a method first proposed in 2.
The additional "outer" signature over the message header (or envelope) plus the ciphertext makes TSP secure against KCI and RUF secure.
A modern and secure public-key signature scheme is used to construct the "outer" signature, namely
Ed25519 3, based in the same elliptic-curve cryptography as HPKE. Ed25519 satisfies properties such as EUF-CMA or
SUF-CMA (existentially unforgeable under chosen message attacks, strong unforgeability).
Non goals
Hiding plaintext length
By default, TSP does not hide the length of plaintext messages. If the size of the plaintext is confidential, the application layer could take measures to hide the length by, for instance, always sending fixed size messages.
Bidirectional mode
TSP messages are unidirectional. There is no default way of "responding" to a TSP message, other than constructing a new unidirectional message.
Cryptographic primitives
The following underlying cryptographic primitives are chosen for the TSP.
Key Encapsulation Method:
DHKEM(X25519, HKDF-SHA256)
Key Derivation Function:
HKDF-SHA256
Authenticated Encryption with Associated Data (AEAD) Function:
ChaCha20Poly1305
Signature scheme:
Ed25519 SHA512
HPKE operation mode:
Auth
Encoding
By default, TSP messages are encoded using CESR 4 with a specific extension for TSP 5.
The methods the seal (encrypt, sign) and open (decrypt, verify) a message also encode and decode the message using CESR in the binary domain.
Using a deterministic and predictable binary encoding helps to reliably sign and verify a TSP message.
HPKE usage
The notation below is based on RFC 9180 6.
We create the message header:
Envelope = ConcatCESR(
    [VID sender, VID receiver, Additional header data]
)
We perform a HPKE Seal operation using the single-shot API in Auth mode:
Ciphertext = SealAuth(
    skS = Sender private key,
    pkR = Receiver public key,
    aad = Envelope,
    pt = Message plaintext
)
We sign the header information together with the ciphertext and encapsulated key:
Signature = Sign(
    skS = Sender private key,
    msg = Concat<CESR>(Envelope, Ciphertext),
)
We construct the final message:
Ciphertext Message = ConcatCESR(
    [Envelope, Ciphertext, Signature]
)
The receiver performs verification and decryption as follows.
Parse the CESR encoded message:
[Envelope, Ciphertext, Signature] = SplitCESR(Ciphertext Message)

[VID sender, VID receiver, Additional header data] = SplitCESR(Envelope)
Verify the outer signature:
Verify(
    pkS = Sender public key,
    msg = ConcatCESR(Envelope, Ciphertext)
)
We perform a HPKE Open operation using the single-shot API in Auth mode:
Message plaintext = OpenAuth(
    pkS = Sender public key,
    skR = Receiver private key,
    aad = Envelope,
    ct = Ciphertext
)
Streaming mode
HPKE allows sealing a stream of messages efficiently by only using symmetric cryptography for subsequent messages. We could extend TSP to allow such a streaming mode by setting up a sender and a receiver context. This context holds the key material for the current stream or "session", as described in session 5.1 of RFC 9180. When using a streaming mode in TSP, only the first message contains the full header and the outer signature.
Note that KCI is not a problem for this mode, since the first message still contains the outer signature (created using the senders’ private key). However, naively implementing a streaming mode using HPKE breaks RUF for subsequent messages. One could include a hash of the next message in each streaming message, and thereby securely links each message back to the initial, signed TSP message. In that case RUF still holds.
References
-
Richard Barnes and Karthikeyan Bhargavan and Benjamin Lipp and Christopher A. Wood, 2022, "Hybrid Public Key Encryption", https://www.rfc-editor.org/info/rfc9180 ↩
-
Jee Hea An, 2001, "Authenticated Encryption in the Public-Key Setting: Security Notions and Analyses", https://eprint.iacr.org/2001/079 ↩
-
Simon Josefsson and Ilari Liusvaara, 2017, "Edwards-Curve Digital Signature Algorithm ( EdDSA)", https://www.rfc-editor.org/info/rfc8032 ↩
-
Samuel M. Smith, 2021, "Composable Event Streaming Representation ( CESR)", https://datatracker.ietf.org/doc/draft-ssmith-cesr ↩
-
https://github.com/WebOfTrust/keripy/discussions/612#discussioncomment-7739043 ↩
-
https://www.rfc-editor.org/rfc/rfc9180.html#name-notation ↩
TSP CESR Encoding
CESR Code Tables
Codes used by TSP that are already in the CESR draft:
| Code | Description | Code Length | Count Length | Total Length |
|---|---|---|---|---|
| I | SHA-256 Digest | 1 | 44 | |
| F | Blake2b256 Digest | 1 | 44 | |
| 0A | 128 bit Nonce | 2 | 24 | |
| 0B | Ed25519 signature | 2 | 88 |
Fixed-length codes introduced by TSP:
| Code | Description | Code Length | Count Length | Total Length |
|---|---|---|---|---|
| X | Type code | 1 | 4 |
Variable-length codes introduces by TSP (note: this just introduces the code "B", "C" and "VID", the length of the table below is caused by the regular CESR encoding scheme for variable length codes).
The type for "VID" is temporary, pending a decision on how to choose/encode VID types; but the code for "VID" dictates
that only a "large" encoding is available. For non-post-quantum, non-did:peer VID's, a shorter encoding will usually
suffice.
| Code | Description | Code Length | Count Length | Total Length |
|---|---|---|---|---|
| 4B | TSP Plaintext Lead Size 0 | 4 | 2 | |
| 5B | TSP Plaintext Lead Size 1 | 4 | 2 | |
| 6B | TSP Plaintext Lead Size 2 | 4 | 2 | |
| 7AAB | TSP Large Plaintext Lead Size 0 | 8 | 4 | |
| 8AAB | TSP Large Plaintext Lead Size 1 | 8 | 4 | |
| 9AAB | TSP Large Plaintext Lead Size 2 | 8 | 4 | |
| 4C | TSP Ciphertext Lead Size 0 | 4 | 2 | |
| 5C | TSP Ciphertext Lead Size 1 | 4 | 2 | |
| 6C | TSP Ciphertext Lead Size 2 | 4 | 2 | |
| 7AAC | TSP Large Ciphertext Lead Size 0 | 8 | 4 | |
| 8AAC | TSP Large Ciphertext Lead Size 1 | 8 | 4 | |
| 9AAC | TSP Large Ciphertext Lead Size 2 | 8 | 4 | |
| 7VID | TSP Verifiable ID Lead Size 0 | 8 | 4 | |
| 8VID | TSP Verifiable ID Lead Size 1 | 8 | 4 | |
| 9VID | TSP Verifiable ID Lead Size 2 | 8 | 4 |
Framing codes introduces by TSP:
| Code | Description | Code Length | Count Length | Total Length |
|---|---|---|---|---|
| -E## | TSP Encrypt&Signed Envelope | 4 | 2 | 4 |
| -S## | TSP Signed-Only Envelope | 4 | 2 | 4 |
| -I## | TSP Hop List | 4 | 2 | 4 |
| -Z## | TSP Payload | 4 | 2 | 4 |
TSP Message format
An encrypted TSP message is encoded as:
<ETS-ENVELOPE> <TSP-CIPHERTEXT> <SIGNATURE>
a non-encrypted TSP message is encoded as:
<S-ENVELOPE> <TSP-PLAINTEXT> <SIGNATURE>
where,
ETS-ENVELOPE ::= -E01 Xvvv Xttt <SENDER-VID> <RECEIVER-VID> <OPTIONAL:TSP-PLAINTEXT>
S-ENVELOPE   ::= -S01 Xvvv Xttt <SENDER-VID> <OPTIONAL:RECEIVER-VID>
vvv contains the two-byte "major.minor" version of TSP (currently "0.0").
ttt contains a two-byte "encryption scheme.signature scheme" type indicator:
encryption scheme
0 — Unencrypted (for "S" envelopes" only)
1 — HPKE in Auth mode
2 — HPKE in Base mode with ESSR
3 — Libsodium in Auth mode
4 — Libsodium in ESSR mode
Specifying an encryption scheme in an "S" envelope is technically an error (since there will be no ciphertext anyway)
signature scheme
0 — Unsigned (Reserved for future use)
1 — Ed25519
A TSP-CIPHERTEXT must, after successful decryption, have one of the two encodings:
AUTH-PAYLOAD ::= -Z01 Xppp <PAYLOAD>
ESSR-PAYLOAD ::= -Z02 <SENDER-VID> Xppp <PAYLOAD>
where ppp contains a two-byte "type.subtype" indicator of the control fields present in the payload, which currently are:
| type.subtype | description | PAYLOAD (after decrypting) |
|---|---|---|
| 0.0 | generic message | <TSP-PLAINTEXT> for direct, -I## <VID> <VID>... <TSP-PLAINTEXT> for routed, with the plaintext holding the tsp message |
| 0.1 | nested message | <TSP-PLAINTEXT> the plaintext holds a (signed, or signed-and-encrypted) TSP message |
| 0.1 | routed message | |
| 1.0 | NEW_REL | <NONCE> |
| 1.1 | NEW_REL_REPLY | <DIGEST> |
| 1.2 | NEW_NEST_REL | <TSP-PLAINTEXT> <NONCE> the plaintext holds a signed-only TSP message where the sender field has the new nested VID, and an empty receiver |
| 1.3 | NEW_NEST_REL_REPLY | <TSP-PLAINTEXT> <DIGEST> the plaintext holds a signed-only TSP message where the sender field has the new nested VID, and the receiver is the nested VID of the other party |
| 1.4 | NEW_REFER_REL | <DIGEST> <VID> |
| 1.5 | 3P_REFER_REL | <VID> |
| 1.255 | REL_CANCEL | <DIGEST> |
API overview
The tsp_sdk library should allow endpoints to seal and open TSP messages. Note that the provided code is pseudo-Rust code; we abstract away from some implementation details.
For a detailed and complete API reference, please take a look at https://docs.rs/tsp_sdk/.
Secure Store
A SecureStore allows the endpoint to store VID-public-key pairs and optionally metadata related to the VID, like a name or transport specification.
A SecureStore the data in memory. SecureStorage can be used to persist this data in a wallet.
We provide the AskarSecureStorage implementation, which uses Aries Askar to securely store the data.
See the custom secure storage page for documentation about how to implement custom secure storage solutions.
The SDK also has the AsyncSecureStore interface that provides an asynchronous version of the SecureStore.
The AsyncSecureStore is a higher level interface which also includes send and receive functions to send or receive TSP messages using the built-in transport layers.
Seal and open a TSP message
Seal means encrypting, authenticating, signing, and encoding a message; open is the reverse operation. Note that the header may contain additional authenticated data. The sender and receiver VID are added to the header by this method.
All the methods below work on a SecureStore instance, which holds the cryptographic details and relations.
#![allow(unused)]
fn main() {
    /// Seal a TSP message.
    /// The message is encrypted, encoded, and signed using the key material
    /// of the sender and receiver, specified by their VIDs.
    ///
    /// Note that the corresponding VIDs should first be added and configured
    /// using this store.
    pub fn seal_message(
        &self,
        sender: &str,
        receiver: &str,
        nonconfidential_data: Option<&[u8]>,
        message: &[u8],
    ) -> Result<(Url, Vec<u8>), Error> {

    /// Decode an encrypted `message`, which has to be addressed to one of the VIDs in `receivers`, and has to have
    /// `verified_vids` as one of the senders.
    pub fn open_message<'a>(
        &self,
        message: &'a mut [u8],
    ) -> Result<ReceivedTspMessage<&'a [u8]>, Error> {

    /// Get the sender from a CESR message
    fn probe_sender(message: &mut [u8]) -> Result<&str, Error> {
}
Sign messages
The following methods allow encoding and signing a message without an encrypted payload.
#![allow(unused)]
fn main() {
/// Sign a unencrypted message, without a specified recipient
pub fn sign_anycast(&self, sender: &str, message: &[u8]) -> Result<Vec<u8>, Error>;
}
Managing VID's
The SecureStore supports the following methods to manage the VIDs. This is just an extraction of the most relevant methods;
see the API docs for the full list.
#![allow(unused)]
fn main() {
/// Add the already resolved `verified_vid` to the wallet as a relationship
pub fn add_verified_vid(&self, verified_vid: impl VerifiedVid + 'static) -> Result<(), Error>;

/// Adds `private_vid` to the wallet
pub fn add_private_vid(&self, private_vid: impl PrivateVid + 'static) -> Result<(), Error>;

/// Remove a VID from the Store
pub fn forget_vid(&self, vid: &str) -> Result<(), Error>;

/// Sets the parent for a VID, thus making it a nested VID
pub fn set_parent_for_vid(&self, vid: &str, parent_vid: Option<&str>) -> Result<(), Error>;

/// Set the relation VID for the VID.
///
/// The relation VID will be used as sender VID when sending messages to this VID.
pub fn set_relation_for_vid(&self, vid: &str, relation_vid: Option<&str>) -> Result<(), Error>;

/// Adds a route to an already existing VID, making it a nested VID
pub fn set_route_for_vid(
    &self,
    vid: &str,
    route: impl IntoIterator<Item: ToString, IntoIter: ExactSizeIterator>,
) -> Result<(), Error>;
}
Library architecture
Dependencies
A software library offering security operations is very prone to mistakes and bugs that compromise the security of the cryptographic protocol as a whole in operation. One of the ways to reduce the amount of code, and thereby reduce the number of possible security bugs, is reducing the number of dependencies on other libraries. The dependencies that are included should adhere to our quality standards, that is, we should have confidence in the authors, and the library must not be abandoned and must have enough active users, i.e., must be popular.
We use the following Rust crates (library dependencies) in our implementation:
- rand: Random number generators and other randomness functionality.
- hpke: An implementation of the HPKE hybrid encryption standard (RFC 9180) in pure Rust.
- hpke_pq: This fork of the
hpkecrate includes experimental support for the hybrid Kyber-X25519 KEM. - ed25519-dalek: Fast and efficient Rust implementation of ed25519 key generation, signing, and verification.
- sha2: Pure Rust implementation of the SHA-2 hash function family.
- blake2: Pure Rust implementation of the BLAKE2 hash function family.
- crypto_box: Pure Rust implementation of NaCl's crypto_box primitive.
Bindings
The library is usable in other languages. We designed the API in a way that allows the use with C, Python, and JavaScript. The SDK contains bindings for JavaScript, Node.js, and Python.
TSP Python bindings
We use PyO3 to generate Python bindings for the TSP SDK. We recommend using uv to manage your Python dependencies, but it is also possible to use pyenv with maturin manually.
To add TSP as a dependency to your uv project, use the following command:
uv add git+https://github.com/openwallet-foundation-labs/tsp#subdirectory=tsp_python
Example usage
Here's an example showing how you can use the Python bindings to send and receive TSP messages. The script goes through the following steps:
- First it creates an
aliceidentity and publishes the did on https://did.teaspoon.world/. - Then, it will resolve
did:web:did.teaspoon.world:endpoint:bob(which may fail if this end-point doesn't exist, in which case you can create it using the TSP CLI). - Once the DID has been resolved, it will send a message saying
"hi bob". If you control Bob's end-point, you should be able to receive the message via the TSP CLI. - Finally, it will start listening for incoming messages until you exit the script. If you send a message to Alice's generated DID via the TSP CLI you should see it be received and printed by the script.
import tsp_python as tsp
import random
import requests

store = tsp.SecureStore()

# Create identity
print("Creating identity")
username = "alice" + str(random.randint(0, 999999))
did = "did:web:did.teaspoon.world:endpoint:" + username
transport_url = "https://p.teaspoon.world/endpoint/" + did
alice = tsp.OwnedVid.bind(did, transport_url)

# Publish DID (this is non-standard and dependents on the implementation of the DID support server)
print("Publishing DID: " + did)
response = requests.post(
    "https://did.teaspoon.world/add-vid",
    data=alice.json(),
    headers={"Content-type": "application/json"},
)
if not response.ok:
    raise Exception(f"Could not publish DID (status code: {response.status_code})")

# Save DID in wallet
store.add_private_vid(alice)

# Resolve other party (may fail if endpoint bob does not exist)
bob_did = "did:web:did.teaspoon.world:endpoint:bob"
print("Resolving DID: " + bob_did)
bob_endpoint = store.verify_vid(bob_did)
print("> Bob's endpoint:", bob_endpoint)

# Send a message
print("Sending message...")
store.send(alice.identifier(), bob_did, b"hi bob")

# Receive messages
print("Listening for messages...")
while True:
    response = store.receive(alice.identifier())
    print("Received: " + str(response))
    if isinstance(response, tsp.GenericMessage):
        print("> " + str(response.message))
Creating identities
The OwnedVid class is used to create and manage identities. It supports did:web, did:webvh, and did:peer identifiers:
class OwnedVid:
    """Class for managing VIDs for which we own the private keys"""

    @staticmethod
    def new_did_peer(url: str) -> OwnedVid:
        """Create a `did:peer` for a particular end-point"""
        ...

    @staticmethod
    def new_did_webvh(did_name: str, transport: str) -> tuple[OwnedVid, str]:
        """Create a `did:webvh` for a name and a transport URL"""
        ...

    @staticmethod
    def bind(did: str, transport_url: str) -> OwnedVid:
        """Create a `did:web` by binding a DID to a transport URL"""
        ...

    def json(self) -> str:
        """Get a JSON representation of the VID"""
        ...

    def identifier(self) -> str:
        """Get the DID"""
        ...

    def endpoint(self) -> str:
        """Get the transport URL"""
        ...
To store a created identity, use the add_private_vid method of your SecureStore.
Secure Store
The SecureStore class exposes the functionality from the Rust AsyncSecureStore, including methods to open and seal messages, and to send and receive messages. The Python SecureStore is connected to a secure storage wallet to store the state, the location of which can be configured during initialization of the SecureStore:
class SecureStore:
    inner: tsp_python.Store

    def __init__(self, wallet_url="sqlite://wallet.sqlite", wallet_password="unsecure"):
        self.inner = tsp_python.Store(wallet_url, wallet_password)
Opening and sealing TSP messages
The open_message and seal_message functions of a SecureStore can be used to open and seal TSP messages:
    def seal_message(
        self,
        sender: str,
        receiver: str,
        message: bytes,
        nonconfidential_data: bytes | None = None,
    ) -> tuple[str, bytes]:
        """
        Seal a TSP message.

        The message is encrypted, encoded, and signed using the key material
        of the sender and receiver, specified by their VIDs.
        """
        with Wallet(self):
            return self.inner.seal_message(
                sender, receiver, message, nonconfidential_data
            )

    def open_message(self, message: bytes):
        """Decode an encrypted `message`"""
        with Wallet(self):
            flat_message = self.inner.open_message(message)
            return ReceivedTspMessage.from_flat(flat_message)
Sending and receiving TSP messages
The send and receive functions of a SecureStore can be used to send and receive TSP messages using the appropriate transport:
    def send(
        self,
        sender: str,
        receiver: str,
        message: bytes,
        nonconfidential_data: bytes | None = None,
    ):
        """
        Send a TSP message given earlier resolved VIDs

        Encodes, encrypts, signs, and sends a TSP message
        """
        with Wallet(self):
            self.inner.send(sender, receiver, message, nonconfidential_data)

    def receive(self, vid: str):
        """Receive a single TSP messages for the private VID identified by `vid`, using the appropriate transport mechanism for it."""
        with Wallet(self):
            message = self.inner.receive(vid)
            return None if message is None else ReceivedTspMessage.from_flat(message)
Managing VIDs
The SecureStore provides a number of functions to manage VIDs. When adding a VID to the wallet (using add_private_vid for your own VIDs, or verify_vid for VIDs from others), it is also possible to set aliases for them, which makes it easy to identify VIDs stored in the wallet.
    def verify_vid(self, did: str, alias: str | None = None) -> str:
        """Resolve DID document, verify it, add vid to the wallet, and its return endpoint"""
        with Wallet(self):
            return self.inner.verify_vid(did, alias)

    def add_private_vid(
        self,
        vid: OwnedVid,
        alias: str | None = None,
        metadata: dict[Any, Any] | None = None,
    ):
        """Adds a private `vid` to the wallet"""
        with Wallet(self):
            self.inner.add_private_vid(vid, alias, metadata)

    def forget_vid(self, vid: str):
        """Remove a `vid` from the wallet"""
        with Wallet(self):
            self.inner.forget_vid(vid)

    def resolve_alias(self, alias: str) -> str | None:
        """Resolve alias to its corresponding DID (if it exists in the wallet)"""
        with Wallet(self):
            return self.inner.resolve_alias(alias)
Transport layers
TSP uses a transport layer to transfer TSP messages between end-points. The TSP SDK provides some built-in transport options, but it is also possible to use your own transport solution.
Built-in transport options
The TSP SDK provides the following transport options:
- HTTP(S), which uses a combination of WebSockets (for receiving messages) and POST requests (to send messages) to get around firewalls for clients which are not necessarily publicly available — this works best when using an intermediary server to route messages
- TCP, which requires a direct network connection between clients
- TLS, which requires valid TLS certificates and a direct connection
- QUIC, which also requires valid certificates and a direct connection
These transports are used by the AsyncSecureStore's send and receive methods, which pick the appropriate transport based on the transport URL's scheme.
Using custom transport
It is also possible to use your own custom transport solution by using the low level TSP API. Use the seal_message and open_message functions (as described here) to seal and open TSP messages.
Sending a message from Alice to Bob via your own transport layer should work as follows:
- Alice resolves Bob's DID (if not yet known)
- Alice seals the message into a TSP message
- Alice sends the TSP message to Bob using your preferred method of transport
- Bob resolves Alice's DID (if not yet known)
- Bob opens the TSP message, retrieving Alice's message
This allows you to use TSP over any transport mechanism, including for example WebSockets, MQTT, email, or any other method of transport available in your particular application. For example, TMCP (MCP with TSP) uses this approach to secure the communication between AI agents and MCP servers.
Implement custom VIDs
The SecureStore, exposed as the primary API for the TSP Rust library,
accepts adding private and verified VIDs.
A private VID is an identity that contains private key material to sign and decrypt messages.
A verified VID is an identity that only contains public key material to encrypt data and verify signatures. In the context of TSP Rust, a verified VID should only be constructed if it is resolved and verified. What verification means depends on the type of VID.
Traits
The SecureStore accepts any private or verified VID that implements the PrivateVid and VerifiedVid traits, respectively.
Each of these traits defines methods to get the VID string itself and methods to get the key material:
#![allow(unused)]
fn main() {
pub trait VerifiedVid: Send + Sync {
    /// A identifier of the Vid as bytes (for inclusion in TSP packets)
    fn identifier(&self) -> &str;

    /// The transport layer endpoint in the transport layer associated with this Vid
    fn endpoint(&self) -> &url::Url;

    /// The verification key that can check signatures made by this Vid
    fn verifying_key(&self) -> &PublicVerificationKeyData;

    /// The encryption key associated with this Vid
    fn encryption_key(&self) -> &PublicKeyData;

    /// The encryption key type associated with this Vid
    fn encryption_key_type(&self) -> VidEncryptionKeyType;

    fn encryption_key_jwk(&self) -> serde_json::Value {
        serde_json::json!({
            "kty": Into::<KeyType>::into(self.encryption_key_type()),
            "crv": Into::<Curve>::into(self.encryption_key_type()),
            "use": "enc",
            "x": Base64UrlUnpadded::encode_string(self.encryption_key().as_ref()),
        })
    }
}

pub trait PrivateVid: VerifiedVid + Send + Sync {
    /// The PRIVATE key used to decrypt data
    fn decryption_key(&self) -> &PrivateKeyData;

    /// The PRIVATE key used to sign data
    fn signing_key(&self) -> &PrivateSigningKeyData;
}
Any Rust type that implements one of these traits can be added to the
store (either AsyncSecureStore or the SecureStore).
Caution: make sure a VerifiedVid is always verified. How VIDs are verified depends on the type of VID used.
DID webvh
The TSP SDK and CLI can resolve DID:webvh natively.
To create a new webvh identity, we use the official Python implementation
by the Decentralized Identity Foundation.
As we rely on a Rust-to-Python interface, you have to compile the SDK or CLI with the create-webvh feature flag to
be able to create webvh identities.
Additionally, you have to prepare the Python environment to run the CLI in.
Create a DID:webvh
Initial setup
- Make sure you compiled the CLI with the
create-webvhfeature flag enabled
cargo install --bin tsp --path ./examples --features create-webvh
- Make sure you activated the Python environment and installed the required dependencies.
For that, make sure you have
uvinstalled on your machine and runuv syncin the./tsp_sdkdirectory.
Create a DID:webvh
Creating a new webvh identity is as easy as running
tsp create --type webvh --alias foo-alias foo
The expected output would be something like
INFO tsp: published DID document at https://did.teaspoon.world/endpoint/foo/did.json
INFO tsp: published DID history
FAQ
Q: I'm getting error: invalid value 'webvh' for '--type <TYPE>': invalid did type: webvh
A: Most likely, you did not compile with the create-webvh feature enabled. Please see Initial setup.
Q: I'm getting error in the underlying Python code base: ModuleNotFoundError: No module named 'aries_askar'
A: Most likely, you did not run the command in an activated python environment with all required dependencies. Please see Initial setup.
Implement custom secure storage
We use the SecureStorage interface to securely store a wallet containing the endpoint's private VIDs and relations. This data must be securely encrypted because it contains the private keys used to send TSP messages.
We provide a AskarSecureStorage implementation of the SecureStorage interface, which is used to securely store the wallets used by the CLI. This implementation uses Askar to securely store the wallet in a database. Our CLI uses SQLite for this, as this is easy to use and does not require you to set up any external tools. However, other databases supported by Askar are also supported. For example, you can enable PostgreSQL using the tsp_sdk/postgres feature, and then you can open a PostgreSQL database with a postgres:// URL.
Secure storage trait
Developers using TSP are free to implement their own secure storage for wallets by implementing the SecureStorage trait:
#![allow(unused)]
fn main() {
#[async_trait]
pub trait SecureStorage: Sized {
    /// Create a new secure storage
    async fn new(url: &str, password: &[u8]) -> Result<Self, Error>;

    /// Open an existing secure storage
    async fn open(url: &str, password: &[u8]) -> Result<Self, Error>;

    /// Write data from memory to secure storage
    async fn persist(
        &self,
        (vids, aliases, update_keys): (Vec<ExportVid>, Aliases, WebvhUpdateKeys),
    ) -> Result<(), Error>;

    /// Read data from secure storage to memory
    async fn read(&self) -> Result<(Vec<ExportVid>, Aliases, WebvhUpdateKeys), Error>;

    /// Close the secure storage
    async fn close(self) -> Result<(), Error>;

    /// Destroy the secure storage
    async fn destroy(self) -> Result<(), Error>;
}
}
Caution: make sure that the data stored using persist() is always securely encrypted to prevent exposing private keys.
TSP SDK Performance metrics
To benchmark the TSP SDK on your machine, you can create a test executable. For the benchmark results we list below, we use the following test executable:
use tsp::{OwnedVid, Store, VerifiedVid};

fn new_vid() -> OwnedVid {
    OwnedVid::new_did_peer("tcp://127.0.0.1:1337".parse().unwrap())
}

fn main() {
    let store = Store::new();
    let alice = new_vid();
    let bob = new_vid();

    store.add_private_vid(alice.clone()).unwrap();
    store.add_private_vid(bob.clone()).unwrap();

    let message = b"hello world";

    for _ in 0..1024 {
        let store = Store::new();
        store.add_private_vid(alice.clone()).unwrap();
        store.add_private_vid(bob.clone()).unwrap();

        let (url, sealed) = store
            .seal_message(alice.identifier(), bob.identifier(), None, message)
            .unwrap();

        assert_eq!(url.as_str(), "tcp://127.0.0.1:1337");

        let _ = store.open_message(&mut sealed.clone()).unwrap();
    }
}
This must be compiled with debug symbols in release mode. Add this to the Cargo.toml:
[profile.release]
debug = true
Now we can use the samply tool (cargo install samply) to see a flamegraph
cargo build --release
samply record -- target/release/benchmark # or whatever your binary is called

The flamegraph shows the call stack on the y-axis, and relative time spent in a particular function on the x-axis. We can see that the call stack starts at start, and eventually gets to our benchmark::main function.
We observe that all time is spent in dependencies, and this makes sense for the operations that we benchmark here. The tsp crate itself is just a thin wrapper around the dependencies, and does not introduce (significant) overhead.
In terms of throughput, we can do some rough math with this binary:
> hyperfine target/release/benchmark
Benchmark #1: target/release/benchmark
  Time (mean ± σ):     359.0 ms ±   5.5 ms    [User: 358.0 ms, System: 0.9 ms]
  Range (min … max):   354.1 ms … 372.7 ms    10 runs
So, 1024 seals and opens (that based on the flamegraph take roughly equal time) takes 360ms. Per second that means (1000 / 360) * 1024 = 2844 seals and opens, or roughly 5600 seals or opens per second.
Conclusions
The TSP SDK is mostly performance limited by two factors
- Operations that interact with the network (that might cause unpredictable latency, etc.)
- The raw speed of the cryptographic primitives, in particular the "large number" multiplications that happen deep inside a Curve25519 implementation.
TMCP: TSP x MCP
TMCP is a fork of the MCP Python SDK that integrates TSP to encrypt and sign MCP messages. This enhancement ensures secure, verifiable communication between AI agents and TMCP-compatible servers.
We provide some example TMCP clients and servers here, along with some documentation on how to use these TMCP clients and servers.
Transport Security with TSP
TMCP supports all standard MCP transport types, with varying levels of security integration:
- Stdio: remains unchanged, as it is only used for local inter-process communication and does not require transport-level security.
- WebSockets: uses TSP to secure the bidirectional message exchange.
- Server-Sent Events (SSE): uses TSP for both the POST requests and the SSE messages.
- Streamable HTTP: uses TSP for all POST requests, responses, and SSE messages.
This TSP integration works by giving the clients and servers their own TSP identity (either a DID Web or a DID WebVH), which is then used to open and seal MCP messages. The sealed TSP messages are then sent over whichever MCP transport is being used (WebSockets, SSE, or Streamable HTTP), after which they are opened and verified on the other side. This allows us to only make minimal changes to the transport layers of MCP while providing the enhanced security of TSP.